Thursday, December 15, 2016

How to Register an Administrator | Super Administrator

Pre-requisites

(1) Only a Super Administrator can invite an Administrator for registration.
(2) Email ID of the Administrator should be of the domain '@capexil.in'
(3) Following details of the Administrator must be ready with the Super Admin:

  • Full Name and Designation at Capexil
  • Email ID to be registered with (should be of the domain '@capexil.in').
  • Mobile Number
  • Region Code (like NR, ER, WR, SR).

How to Register an Administrator

  1. Login as a Super Administrator 
  2. Go to Top Menu > Site Administration
  3. Under Site Administration, click on the link 'Register an Administrator'. 
  4.  A new screen will open, as per the screenshot below:
  5. In the 'Name' field, please enter full name of the administrator, with his/her Designation at Capexil separated by a comma, e.g. Kiran Kumar, Deputy Director, Capexil.
  6. Enter Mobile Number in the mobile number field.
  7. Enter Email (of '@capexil.in') of the Admin in the email field.
  8. Select Region code from the drop down.
  9. Click on 'Register Administrator'. 
The system will then send an email to the Administrator as an invite. The Admin must accept the invite and proceed with logging-in to the system with the credentials received in the email invite itself. 

Saturday, July 2, 2016

How to Reconcile a Payment

Prerequisite

User must be signed in as an Administrator. And, there must be at least one payment in the system that the user can reconcile.

Reconcile is basically to correct an existing payment entry, but in our system, an Administrator can add Reconcile payment information without changing the base payment data.

This feature will show up only for "Cheque-DD" based payments.

Word of Caution


This is a feature to allow Admin to reconcile payment only in case of worst case scenarios. They must adhere to the rules laid down by the system, allow minimum delay and ensure payment details are filled and submitted correctly & timely. Admins must try and avoid using this feature in most cases.


How to Reconcile


Login as Administrator
Go to top menu, Other listing > All Payments
From the list of payments shown, Admin must OPEN a payment that he wants to reconcile.
On the payment detail page, Admin would see a button "Reconcile" to reconcile the payment.
  Once the Admin would click on the "Reconcile" button, a new window would show up


Admin must fill all fields and must save.

Upon successful save, the reconcile payment record would be shown on the actual payment page (click on "Back to Payment" after saving).


Editing a Reconciled Payment


See the screenshot above - Administrator must click on "OPEN" button alongside the reconcile payment they wish to edit. Another screen will open that will allow Admin to edit the reconciled payment.

Email notification to Users, All Admins, and Super-Admin


Whenever a reconcile payment record is added a fresh, or modified an email will be sent to the associated user, all Admins and the super admin.


Reconcile Payment list part of downloaded Payment Excel


The reconcile payment list (the complete list, ignoring the date range for payments) will be downloaded as a separate sheet,  in the date range payment excel downloaded from the Payment listing page.


In the same excel, the sheet showing the date-range payment list, will also have an additional column called Reconciliation Balance, that will show if payment was received less or in access of actual amount.


Monday, May 30, 2016

Changes to Payment Listing Page for Administrators

Prerequisite

User must be an Administrator

Top most listing of Payments

The topmost table on the Payment listing page (Top Menu > Other Listings > All Payments) now shows payments of all certificates with status 'Applied' or 'Approved.'  Earlier it was only 'Approved' certificate payments being shown.


This will help Administrators mark payments of those Certificates which are APPLIED (not yet APPROVED) and yet the payment has been received. The certificates would eventually get approved later, but there is now a provision to mark payments as Complete before Approval.


Query using Certificate Status type

Administrators can now query payment listing, based on an additional parameter called CertificateStatus. This is the status of shipment or plant approval certificate of which the payment corresponds to.

Introducing 'NEW' payment status

A new payment status has been introduced called 'New'.  When a user creates a new certificate, its payment status shall remain 'New'.  Earlier, system would mark the payment as 'Pending' even when the certificate was in NEW State. 

There are many users who would create multiple NEW certificates and just save-and-keep those, never to Apply for Approval. The respective payments of those certificates would always be recorded in our system as Pending. 

Now, while querying, system would ignore 'New' Payments, thereby also ignoring New Certificates in case of payment computations, giving more accuracy in results.

Wednesday, January 6, 2016

Introducing Payment Gateway

Prerequisite

User must be an approved or a guest Member. In other words, user should be an industrial user and not an Administrator or Super Administrator

How to Pay using Online Payments

This is applicable for both Plant Approval and Shipment Clearance certificates.

As an industrial user, while you begin applying for your certificate:


  1. Select NetBanking from the drop-down of Mode of Payment
  2. Save this certificate in its completeness, by filling the required information.
  3. Just as you come back to this certificate for applying after doing the save, you would see a button "proceed to payment gateway"right below the mode of payment drop-down.
  4. Click on this proceed to payment gateway button in order to complete the payment process.
  5. Once payment is complete (you would get a confirmation), only then you would be able to apply for this certificate. 
All the above instructions will also be available to the user on the respective certificate page while applying.

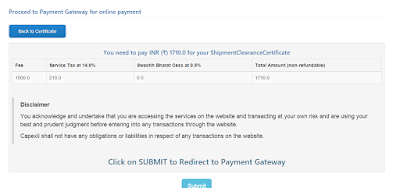
Before proceeding to the Gateway

User would see a confirmation page before proceeding to the payment gateway. User can either opt to go back to the certificate or proceed to payment by clicking on SUBMIT button.  Here, the payment amount is also shown.


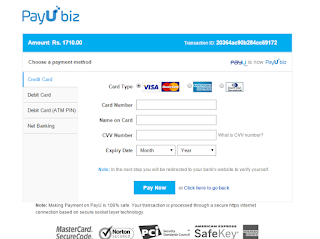
Gateway Page

Upon click on SUBMIT user would be redirected to the payment gateway page. Here, user would have to select any of the payment options available on the page.


Success and Failure Response Page

Upon successful payment, user would see the response page (left) as a confirmation of payment. An email shall be sent to the user about the status.

User would be able to APPLY only after successful payment!

Once user clicks on 'Back to Certificate' user would also see successful payment information on the certificate page as below